Introduction
This guide is designed to help you build a GitHub App using Probot, a framework for building automated workflows. The app will be simple: it will add a label to any new issue that’s opened in a repository the app is installed on.
This is a video of what is written below
Contents:
- Create the GitHub App
- Generating a new app
- Configuring a GitHub App
- Update App Permissions
- Add Labels to new issues
- Installing the App on a repo
- Running the App locally
- Deploy to Lambda
Once you’ve worked through the steps, you’ll be ready to develop other kinds of integrations using the full suite of GitHub APIs.
Prior knowledge needed
You may find it helpful to have a basic understanding of the following:
- GitHub Apps
- Webhooks
- The JavaScript programming language (there’s no official link)
- REST APIs
But you can follow along at any experience level. We’ll link out to information you need along the way!
Create the GitHub App
To develop a Probot app, you will first need a recent version of Node.js installed. Open a terminal and run node -v to verify that it is installed and is at least 8.3.0 or later. Otherwise, install the latest version.
Generating a new app
create-probot-app is the best way to start building a new app. It will generate a new app with everything you need to get started and run your app in production.
To get started, run one of this command:
$ npx create-probot-app my-first-app
This will ask you a series of questions about your app, which should look something like this:
Let's create a Probot app!
? App name: my-first-app
? Description of app: A "Hello World" GitHub App built with Probot
? Author's full name: Katie Horne
? Author's email address: katie@auth0.com
? Homepage:
? GitHub user or org name: khorne3
? Repository name: my-first-app
created file: my-first-app/.env.example
created file: my-first-app/.gitignore
created file: my-first-app/.travis.yml
created file: my-first-app/LICENSE
created file: my-first-app/README.md
created file: my-first-app/app.json
created file: my-first-app/index.js
created file: my-first-app/package-lock.json
created file: my-first-app/package.json
created file: my-first-app/docs/deploy.md
Finished scaffolding files!

Installing Node dependencies!

Done! Enjoy building your Probot app!
The most important files note here are index.js, which is where the code for your app will go, and package.json, which makes this a standard npm module.
Configuring a GitHub App
To run your app in development, you will need to configure a GitHub App to deliver webhooks to your local machine.
- On your local machine, copy
.env.exampleto.env. - Go to smee.io and click Start a new channel. Set
WEBHOOK_PROXY_URLin.envto the URL that you are redirected to. - Create a new GitHub App with:
- Webhook URL: Use your
WEBHOOK_PROXY_URLfrom the previous step. - Webhook Secret:
development(Note: For optimal security, Probot apps require this secret be set, even though it’s optional on GitHub.). - Permissions & events is located lower down the page and will depend on what data you want your app to have access to. Note: if, for example, you only enable issue events, you will not be able to listen on pull request webhooks with your app. However, for development we recommend enabling everything. Click save and move to the next step for now.
- Webhook URL: Use your
- Download the private key and move it to your project’s directory. As long as it’s in the root of your project, Probot will find it automatically regardless of the filename.
- Edit
.envand setAPP_IDto the ID of the app you just created. The App ID can be found in your app settings page here
Update App permissions
When you first configured your new GitHub App, you accepted the default permissions, which amount to “no access” for most operations.
But your app is going to need permission to read issues and write labels. To update its permissions, return to the app settings page, choose your app, and click Permissions & Webhooks in the sidebar.
- In the permissions section, find Issues, and select Read & Write in the Access dropdown next to it. The description says this option grants access to both issues and labels, which is just what you need.
- In the events section, subscribe to Issues events.
Save your changes!
Note: Any time you change your app’s permissions or webhooks, users who have installed the app (including yourself!) will need to accept the new permissions before the changes take effect. Users who have installed the app will receive an email prompting them to accept the new permissions. Make sure to check your own email and follow the link to accept the new permissions.
Great! Your app has permission to do the tasks you want it to do. Now you can add the code to make it work.
Make sure you install the app on the repository you want to use it on!
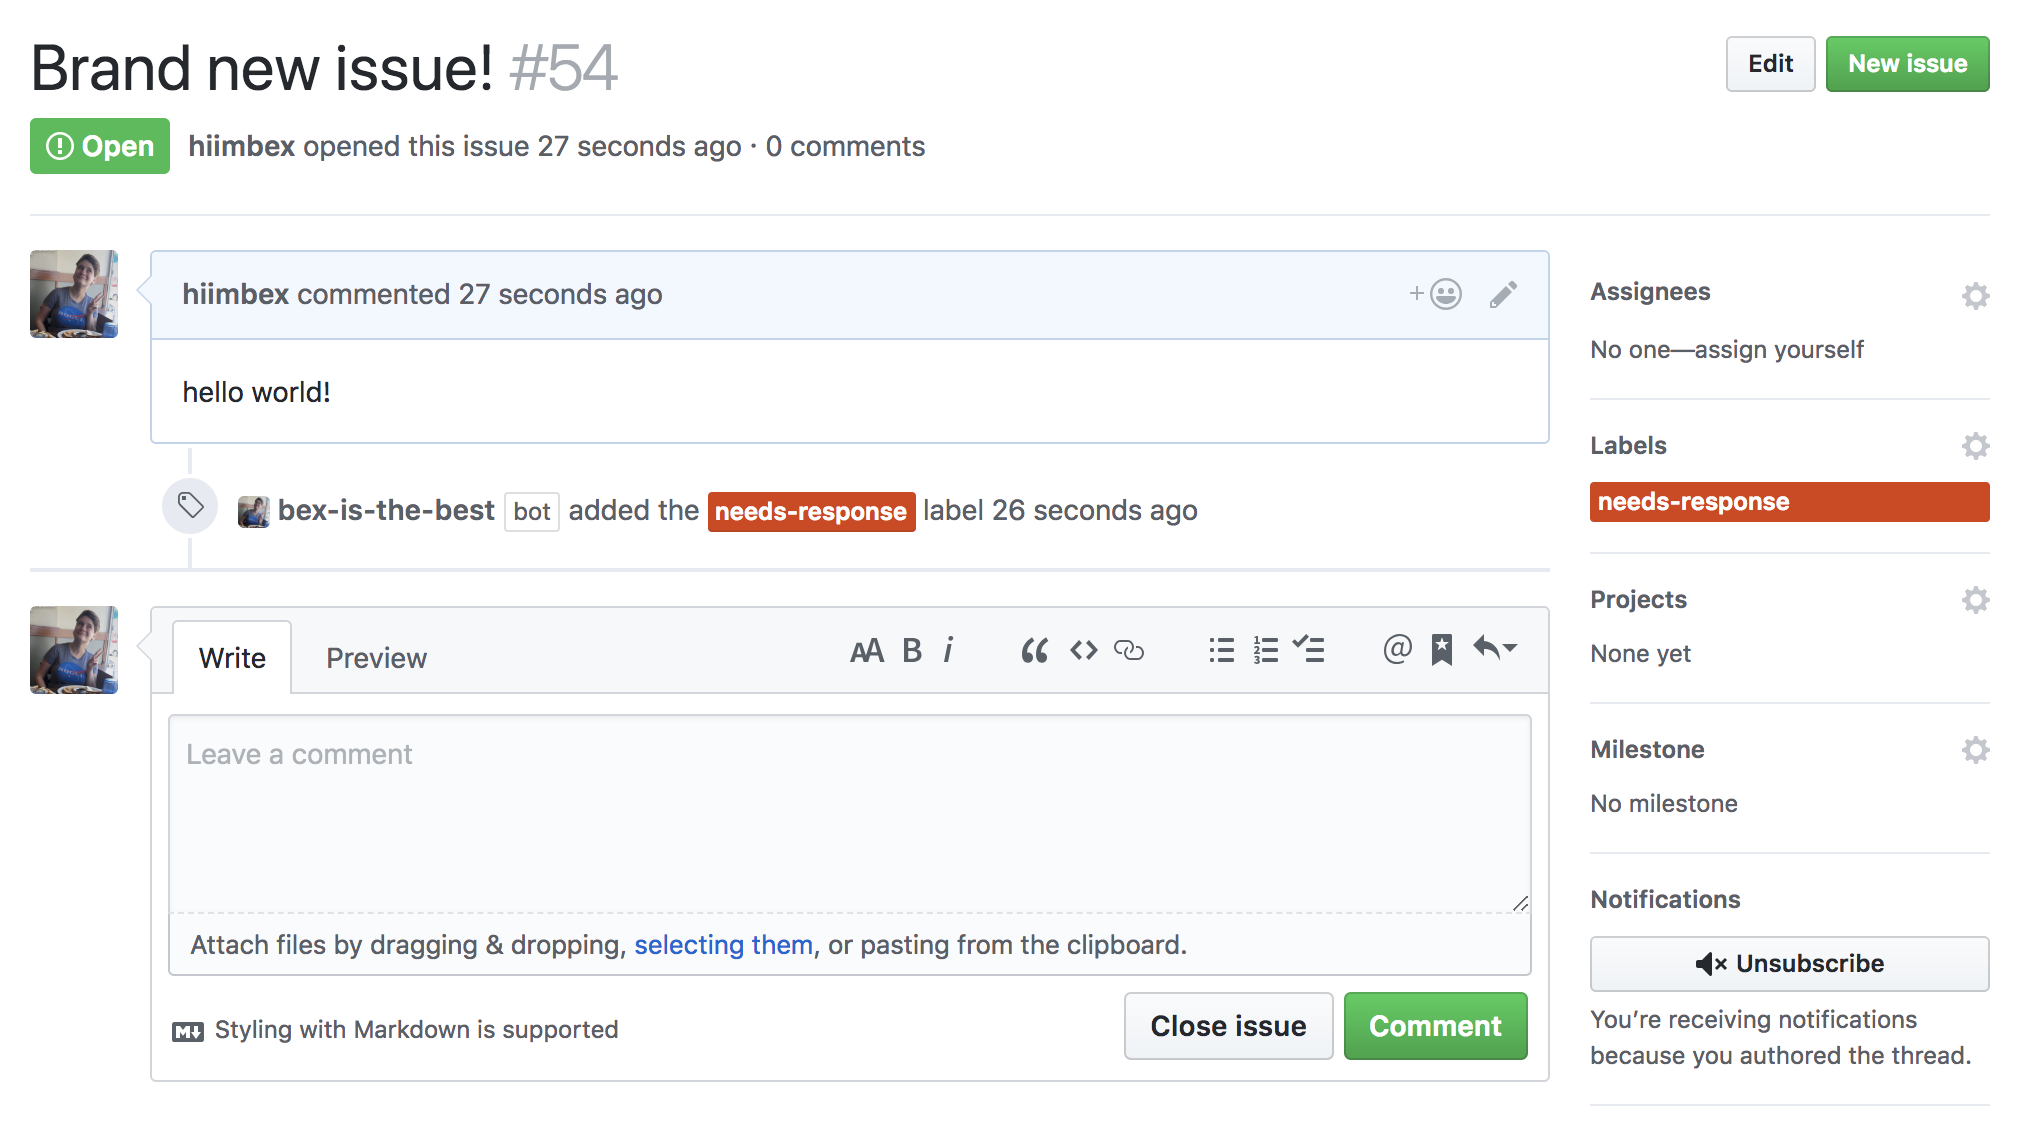
Add labels to new issues
OK, your app can tell when issues are opened. Now you want the app to add the label needs-response to any newly opened issue.
First, create the label. For the purposes of this guide, create the label manually via the GitHub website. In your repository, click Issues, then Labels, then click the New label button. Name the new label needs-response.
Note: Wouldn’t it be great if your app could create the label programmatically? It can! Try adding the code to do that on your own after you finish the steps in this guide.
Now that the label exists, you can program your app to use the REST API to add the label to any newly opened issue.
We already know that Probot handles the authentication side of things, but what Probot also does is pass in an authenticated Octokit instance in the form of context.github that allows you to utilize GitHub’s REST API.
Now we can copy this code into our index.js:
module.exports = app => {
 // a typical probot app only exports `app`
  app.on('issues.opened', check)
  // when issues are opened call the `check` fucntion
  async function check (context) {
  // `check` fucntion that takes a context that has a `context.payload` the webhook payload and `context.github` authenticated github client using octokit/rest.js
    await context.github.issues.addLabels(context.issue({ labels: ['needs-response'] }))
    // await because it's async,
    // issues.addLabels() is from octokit/rest.js docs
    // context.issue() is an internal probot api that returns => {owner: 'username', repo: 'reponame', 'number': 123}
    // context.issue() is specific to the issue webhook event that was triggered and contains the info to reference that specific issue
  }
}
Now we can install the app on any repository, and any time a new issue is opened, it will add the label ‘needs-response’ to all newly opened issues, like so:
Installing the app on a repo
You’ll need to create a test repository and install your app by clicking the “Install” button on the settings page of your app, e.g. https://github.com/apps/your-app

Running the app locally
Now you’re ready to run the app on your local machine. Run npm run dev to start the server:
$ npm run dev

> my-app@1.0.0 dev /Users/z/Desktop/foo
> nodemon --exec "npm start"

[nodemon] 1.17.2
[nodemon] to restart at any time, enter `rs`
[nodemon] watching: *.*
[nodemon] starting `npm start`

> my-app@1.0.0 start /Users/z/Desktop/foo
> probot run ./index.js

18:11:55.838Z INFO probot: Yay, the app was loaded!
The dev script will start your app using nodemon, which will watch for any files changes in your local development environment and automatically restart the server.
Other available scripts
$ npm startto start your app without watching files.$ npm run lintto lint your code using standard.
Deploy to Lambda
Running your Application locally is not ideal for most use cases. This section will cover deploying your application to production.
Choosing a FaaS provider is mostly dependent on developer preference. This guide will walk through deploying to Lambda, but keep in mind there is a Google Cloud Function plugin available.
AWS Lambda is an event-driven, serverless computing platform provided by Amazon as a part of the Amazon Web Services. AWS Lamba additionally manages the computing resources required for the code and adjusts those resources in conjunction with incoming events.
- Install the @probot/serverless-lambda plugin.
- Create a
handler.jsfile in the route of you probot application// handler.js const { serverless } = require('@probot/serverless-lambda') const appFn = require('./') module.exports.probot = serverless(appFn) - Follow the lambda configuration steps using the the Serverless framework.
note: The Servereless framework provides a simpler approach to setting up your AWS environment. It requires the creation of a serverless.yml in the root of your application.
- Create a
serverless.ymlfile that includes all environments variables.service: lambda-probot-express provider: name: aws runtime: nodejs8.10 region: us-east-1 functions: router: handler: handler.probot environment: # replace values with one\'s assocaited to your app WEBHOOK_SECRET: _replace with your secret_ APP_ID: _replace with your App's ID_ LOG_FORMAT: json events: - http: path: /probot method: post - Once the app is is configured and you can proceed with deploying using the deploy command
serverless deploy - Do not forget to update the Webhook URL in the GitHub App settings page.
Congrats
Your project can now be called on-demand each time event triggers your application. Check out the official Probot documentation for more info on how you can integrate GitHub Apps into your development workflow.