The following takes Ubuntu Bionic (18.04) as an example.
For Windows, see here.
-
Install
clangdfrom the apt repositories-
Add the GPG key:
$ wget -O - https://apt.llvm.org/llvm-snapshot.gpg.key | sudo apt-key add - -
Add the LLVM apt repository as listed on the above web page:
You have to change the following command depending on your Ubuntu version. Please check the apt repositories' web page as described above. The minimal LLVM version required is
7. Here I use version10anyway.sudo su -c "cat > /etc/apt/sources.list.d/llvm-toolchain-bionic.list <<EOF deb http://apt.llvm.org/bionic/ llvm-toolchain-bionic-10 main deb-src http://apt.llvm.org/bionic/ llvm-toolchain-bionic-10 main EOF"
-
Fetch information from the newly added repository:
$ sudo apt update -
Install clang-tools:
$ sudo apt install clang-tools-10 clangd-10 -
Prefer using the installed clangd:
$ sudo update-alternatives --install /usr/bin/clangd clangd /usr/bin/clangd-10 100 -
Make sure
clangdis available with the correct version:$ clangd --versionclangd version 10.0.0-svn371101-1~exp1+0~20190905175528.1178~1.gbpc222ee (trunk)
-
You would have to generate a compile_commands.json file.
-
If your project uses
cmake,$ cmake path/to/source -DCMAKE_EXPORT_COMPILE_COMMANDS=ONshould generate acompile_commands.jsonin the current directory. -
If your project uses
make, use compiledb to generate it. You may check the readme oncompiledb's GitHub repository.- Install
compiledb:$ sudo pip install compiledb compiledbis just a wrapper ofmake. Usecompiledb makeas if you are usingmake. So you may probably docompiledb make allin yourMakefiledirectory.compile_commands.jsonshould be generated at the same directory in the above step.
- Install
The generated compile_commands.json usually has no information about header files,
so you would see nonsense output from the LSP.
But we could add header files information to compile_commands.json.
- Install compdb:
$ sudo pip install compdb - Assuming a build directory
build/, containing acompile_commands.json, a new compilation database, containing the header files, can be generated with:$ compdb -p build/ list > compile_commands.json. You may check the readme oncompdb's GitHub repository.
After we have a decent compile_commands.json, it's all set now.
Copy the generated compile_commands.json to your project root.
You may want to add compile_commands.json into you .gitignore as well.
-
Install LSP via Package Control.
-
Here's a
clangdLSP settings example (Menu > Preferences > Packages Settings > LSP > Settings):{ "clients": { "clangd": { "enabled": true, "command": [ "clangd", // you may use an absolute path for this clangd executable "-function-arg-placeholders=0", "-header-insertion-decorators=1", "-index", ], "scopes": ["source.c", "source.c++", "source.objc", "source.objc++"], "syntaxes": [ "Packages/C++/C.sublime-syntax", "Packages/C++/C++.sublime-syntax", "Packages/Objective-C/Objective-C.sublime-syntax", "Packages/Objective-C/Objective-C++.sublime-syntax", ], "languageId": "cpp", }, }, }
-
If you have other related linters enabled, you may want to disable them since LSP is more powerful. To do that in your project, edit the project settings (
Menu > Project > Edit Project):{ "folders": [ // ... not important, here are just your project folders ], "settings": { // for example, to disable some other C/C++ linters "SublimeLinter.linters.gcc.disable": true, "SublimeLinter.linters.clang.disable": true, "SublimeLinter.linters.clang++.disable": true, } }
- https://lsp.readthedocs.io/en/stable/cplusplus/#clangd
- sublimelsp/LSP#398
- https://github.com/nickdiego/compiledb
- https://github.com/Sarcasm/compdb#generating-a-compilation-database-including-header-files
- https://clang.llvm.org/extra/clangd/Installation.html
I hardly write C/C++ codes on Windows but I did make some trying.
The official LLVM/Clang support on Windows is for MSVC-only.
So I use MSVC + LLVM/Clang combination to make clangd work.
-
Donwload the Visual Studio Build Tools 2017 or 2019
vs_buildtools.exe. -
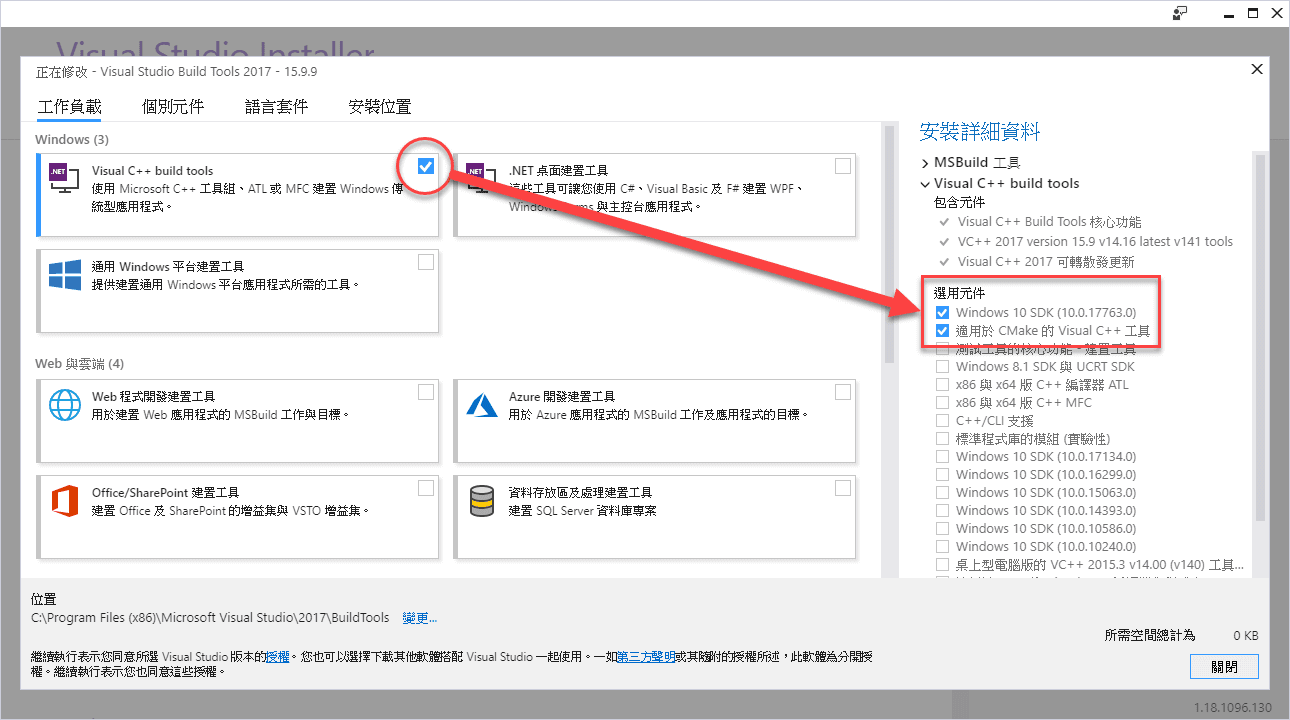
Execute
vs_buildtools.exeand installVC++ build tools,Windows 10 SDKandCMake VC++ toolsas shown in this screenshot. -
Download one of the following. Remember that the minimal version has to be
7forclangdto work properly. I use stableLLVM 9.0.0when I am writing this note. -
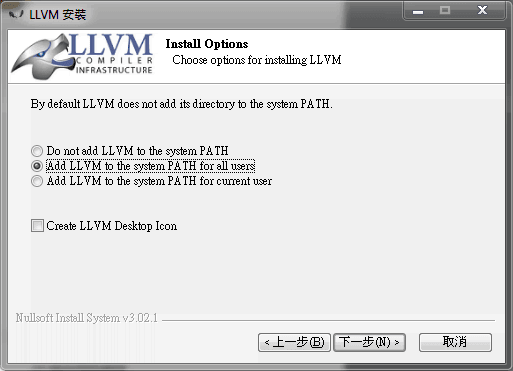
Install the downloaded offline LLVM installer. During the installation, there is an option to add LLVM into
PATHenv. -
Maybe you have to reboot your PC to make the new
PATHenv work. -
Make sure
clangdis available from PATH. Opencmdand execute$ clangd --versionshould show something likeclangd version 9.0.0 (tags/RELEASE_900/final). -
I use the same LSP settings with the one I used in
Ubuntuabove. Of course, you still have to deal with generating acompile_commands.jsonwhich seems to be a harder part on Windows.
cquery LSP does quite the same thing.
The key is that you have to generate a compile_commands.json for your project.
But, it looks like cquery
has been abandoned due to its inactivity and the thriving of clangd which is
developed by the official LLVM/Clang team.