Characters are actors used to represent scene entities that are placed on top of the backgrounds.
A character actor is defined with a name, appearance, visibility, transform (position, rotation, scale) and look direction. It can change appearance, visibility, transform and look direction over time.
Characters' behavior can be configured using Naninovel -> Configuration -> Characters context menu; for available options see configuration guide. The characters' resources manager can be accessed using Naninovel -> Resources -> Characters context menu.
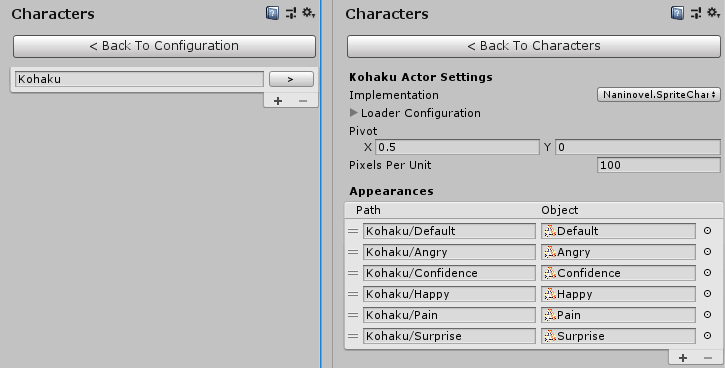
In case you have a lot of characters and/or appearances per character and it's inconvenient to assign them all via editor menu, it's possible to just drop them at Resources/Naninovel/Characters folder, grouped under folders corresponding to actor ID. Eg, to add appearances for a character actor with "Kohaku" ID, store the textures (sprites) at Resources/Naninovel/Characters/Kohaku folder and they'll automatically be available in the scripts.
You can additionally organize appearance resources with sub-folders, if you wish; in this case use forward slashes (/) when referencing them in naninovel scripts. Eg, appearance texture stored as Resources/Naninovel/Characters/Kohaku/Casual/Angry can be referenced in scripts as Casual/Angry.
It's also possible to use addressable asset system to manually expose the resources. To expose an asset, assign address equal to the path you'd use to expose it via the method described above, except omit the "Resources/" part. Eg, to expose a "Happy" appearance for "Kohaku" character, assign the texture asset following address: Naninovel/Characters/Kohaku/Happy. Be aware, that addressable provider is not used in editor by default; you can allow it by enabling Enable Addressable In Editor property in resource provider configuration menu.
In naninovel scripts, characters are mostly controlled with [@char] command:
; Shows character with name `Sora` with a default appearance.
@char Sora

; Same as above, but sets appearance to `Happy`.
@char Sora.Happy

; Same as above, but also positions the character 45% away from the left border
; of the scene and 10% away from the bottom border; also makes him look to the left.
@char Sora.Happy look:left pos:45,10
Each character has Poses property allowing to specify named states (poses).
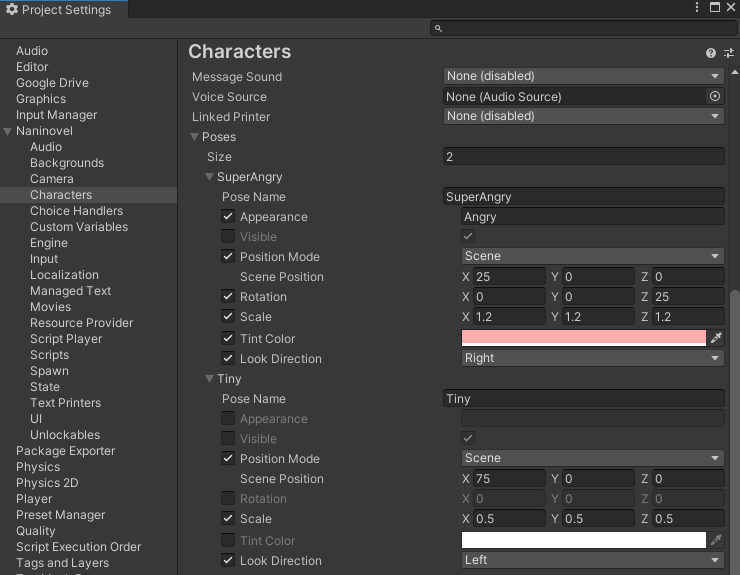
Pose name can be used as appearance in [@char] command to apply all the selected parameters specified in the pose at once, instead of specifying them individually via the command parameters.
; Given `SuperAngry` pose is defined for `Kohaku` character,
; applies all the selected parameters specified in the pose.
@char Kohaku.SuperAngry

; Same as above, but using `DropFade` transition over 3 seconds.
@char Kohaku.SuperAngry transition:DropFade time:3
Notice, that when a pose is used as appearance, you can still override individual parameters, eg:
; Given `SuperAngry` pose is defined for `Kohaku` character,
; applies all the parameters specified in the pose state,
; except tint, which is overridden in the command.
@char Kohaku.SuperAngry tint:#ff45cb
In the character configuration you can set a Display Name for specific characters. When set, display name will be shown in the printer name label UI, instead of the character's ID. This allows using compound character names, that contains spaces and special characters (which is not allowed for IDs).
For localization, use "CharacterNames" managed text document, which is automatically created when running generate managed text resources task. Values from the "CharacterNames" document won't override values set in the character metadata when under the source locale.
It's possible to bind a display name to a custom variable to dynamically change it throughout the game via naninovel scripts. To bind a display name, specify name of the custom variable wrapped in curly braces in the character configuration menu.

You can then change the variable value in the scripts and it will also change the display name:
@set PlayerName="Mistery Man"
Player: ...

@set PlayerName="Dr. Stein"
Player: You can call me Dr. Stein.
It's also possible to use the name binding feature to allow player pick their display name using [@input] command:
@input PlayerName summary:"Choose your name."
@stop
Player: You can call me {PlayerName}.
The content of the curly braces is actually treated as a full-fledged script expression, allowing complex scenarios for evaluating the display name. For example, you may want to keep a pre-defined localizable display name for a character until some point and then let the player pick a custom name.
Let's say the character in questions has "Char1" ID, pre-defined name is stored as "T_PredefinedName" managed text record, the value entered by the player will be stored as "name" custom variable and "nameSet" variable will be set to "true" when player has set the name. Assign the following expression to the Display Name property: { nameSet ? name : T_PredefinedName }.
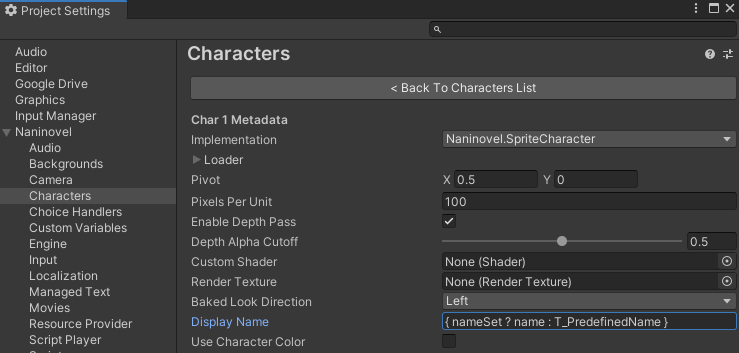
Then use the following scenario script:
@char Char1

Char1: My name is now pre-defined by `T_PredefinedName` managed text record.
Char1: It's localizable; try changing the locale and it will update accordingly.
Char1: Now, we'll make the player input a custom name.

; Notice the default input value assigned via `value` parameter:
; it's retrieved from managed text and is localizable as well.
@input name summary:"Choose your name." value:{T_DefaultName}
@stop

; Here we set the variable, that is used in the expression
; for display name to decide where to get the value from.
@set nameSet=true

Char1: My display name is now bound to `name` custom variable assigned by the player.

@stop
When Use Character Color is enabled in the character configuration, printer text messages and name labels will be tinted in the specified colors when the corresponding character ID is specified in a [@print] command or generic text line.
The following video demonstrates how to use display names and character colors.
[!!u5B5s-X2Bw0]
You can assign avatar textures to characters using avatar parameter of [@char] command. Avatars will be shown by the compatible text printers when they print a text message that is associated with the character.

Currently, only Wide and Chat built-in printers (as well as their TMPro-counterparts) support the avatars feature. In order to support the feature in a custom printer, assign a game object with Author Image component to Author Avatar Image property of Revealable Text Printer Panel component.
To use any given avatar, you have to first add it to the avatar resources and give it a name. You can do this via Avatar Resources property in the characters configuration menu.
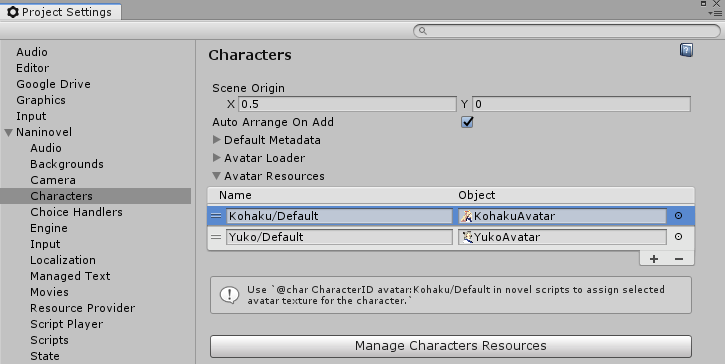
::: note Avatar names can be arbitrary and don't have to contain an existing character ID or appearance. This is only required when you want to associate an avatar with a character so that it's shown automatically. :::
You can then show a specific avatar texture like this:
@char CharacaterId avatar:AvatarName
To set a default avatar for a character, give the avatar texture resource name that equals to CharacterID/Default; eg, to set a default avatar for character with ID Kohaku name the avatar resource Kohaku/Default. Default avatars will be shown automatically, even when avatar parameter is not specified in the [@char] commands.
It's also possible to associate avatars with specific character appearances, so that when character changes appearance, the avatar will also change automatically. For this, name the avatar resources using the following format: CharacterID/CharacterAppearance, where CharacterAppearance is the name of the appearance for which to map the avatar resource.
To show only the avatar of a character inside a text printer, but hide the character itself, set visible parameter of the [@char] command to false, eg:
@char CharacaterId visible:false
In case you're constantly changing avatars while the character itself should remain hidden, consider disabling Auto Show On Modify in the characters configuration menu; when disabled, you won't have to specify visible:false to change any parameters of the character while it's hidden.
::: note The avatars are not directly connected with character appearances and shouldn't be considered as a way to represent a character on scene. Avatars is a standalone feature, that "injects" an arbitrary image to a compatible text printer. In case you want an actual character appear inside a text printer (or a custom UI), check render actor to texture feature. :::
When enabled in the character configuration, will set specified poses to the character based on whether the last printed message is associated with it. The video below demonstrates the feature with a previous version of Naninovel, where it was possible to apply only tint color for speakers; setup with the current version is similar, but instead tint color, specify a pose name.
[!!gobowgagdyE]
Generic, layered and Live2D character implementations support lip synchronization feature, allowing drive character's mouth animation while it's the author of the printed message by sending the appropriate events.
[!!fx_YS2ZQGHI]
When auto voicing feature is enabled, lip sync events will be driven by the voice over; otherwise, printed text messages will activate the events. In the latter case, you'll probably sometimes want to manually start or stop the lip sync (eg, to prevent mouth animation when punctuation marks are printed); for such cases, use [@lipSync] command.
See Generic, layered and Live2D character implementation docs below for the details on how to set up the lip sync feature.
It's possible to associate a text printer with a character using Linked Printer property.
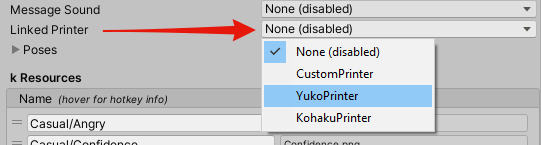
When linked, the printer will automatically be used to handle messages authored by the character.
Be aware, that [@print] commands (that are also used under the hood when printing generic text lines) make associated printers default and hide other visible printers by default. When printers are linked to characters, print commands will automatically change the currently visible and default text printer, while printing text associated with the corresponding characters. It's possible to prevent this behavior by disabling Auto Default property in printer actor configuration menu; when disabled you'll have to manually show/hide and switch default printers with [@printer] commands.
Sprite implementation of the character actors is the most common and simple one; it uses a set of texture assets wrapped over a quad mesh (sprite) to represent appearances of the character. The textures can be based on .jpg, .png, .tiff, .psd or any other image file format supported by Unity.
::: tip Choose file formats that are most comfortable for your development workflow. When building the project, Unity will automatically convert all the source resources (textures, audio, video, etc) to the formats most suitable for the target platform, so it won't make difference in which format you originally store the resources in the project. Find more information on how Unity manage project assets in the official documentation. :::
Initial (unscaled) size of the sprite character mesh on scene depends on the reference resolution (camera configuration), character's Pixel Per Unit property (set for each character actor in the configuration menu) and source texture resolution.
To achieve best render quality and optimal performance, it's generally advised to keep the default Pixel Per Unit value (100) for all the characters and control the desired initial character size via texture resolution. For example, given reference resolution in your game is the default 1920x1080 pixels, to make a character occupy the whole screen height, set height of the character's texture (eg, by resizing it via Photoshop or other image editor) to 1080 pixels; to make another character occupy 2/3 of the screen height, set the height to 1080 * 2/3 and so on.
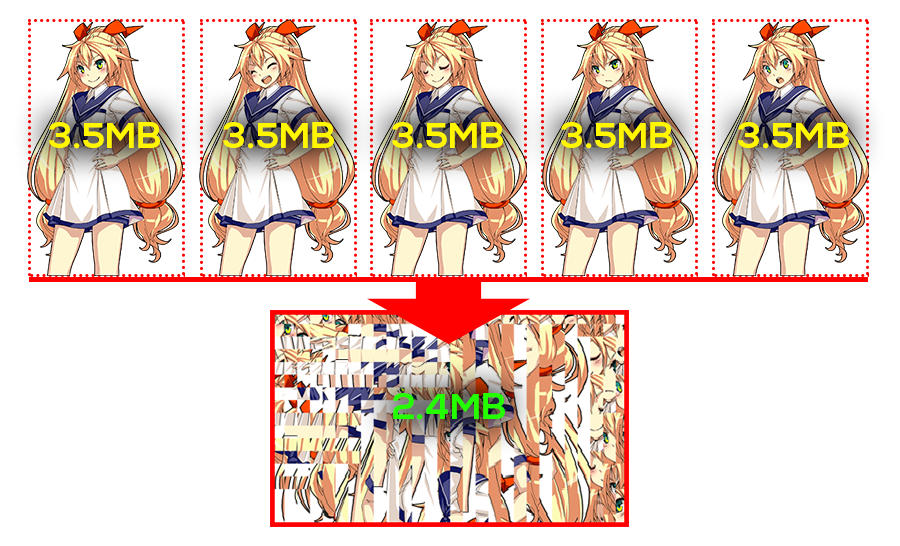
Built with an open source SpriteDicing package, DicedSpriteCharacter implementation allows to significantly reduce build size and texture memory by reusing texture areas of the character sprites.
Install the package via Unity package manager: open package manager window (Window -> Package Manager), click "+" button, choose "Add package from git URL", enter https://github.com/Elringus/SpriteDicing.git#package to the input field and click "Add".
[!b54e9daa9a483d9bf7f74f0e94b2d38a]
::: note Before installing a package from a Git repository, make sure a Git client is installed on your machine and Git executable path is set to the PATH system environment variable (usually performed automatically during the installation). :::
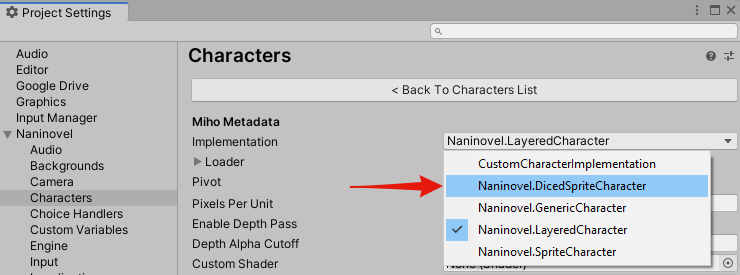
When "SpriteDicing" extension is installed via UPM, a Naninovel.DicedSpriteCharacter option will appear in the character implementations list.
DicedSpriteAtlas assets containing character appearances are used as the resources for the diced sprite characters. Each appearance is mapped by name to the diced sprites contained in the atlas.
::: tip Character metadata properties (eg, pixels per unit, pivot) are applied to render texture used to represent the character on scene, while similar diced atlas properties are applied to the generated diced sprites. When changing atlas properties, don't forget to rebuild it for changes to take effect. :::
Following video guide covers creating and configuring diced sprite atlas, adding new diced character based on the created atlas and controlling the character from a naninovel script.
[!!6PdOAOsnhio]
The layered implementation allows composing characters from multiple layers and then toggle them individually or in groups via naninovel scripts at runtime.
To create a layered character prefab, use Create -> Naninovel -> Character -> Layered asset context menu. Enter prefab editing mode to compose the layers. Several layers and groups will be created by default. You can use them or delete and add your own.
Each child game object of the root prefab object with a renderer-derived component (eg, SpriteRenderer, MeshRenderer, eg) is considered a layer; other objects considered groups. Aside from organization and transformation purposes, placing layers inside groups will allow you to select a single layer or disable/enable all the layers inside a group with a single expression in naninovel script (more on that later).
To hide specific layers from being visible by default, disable renderer components (not the game objects).
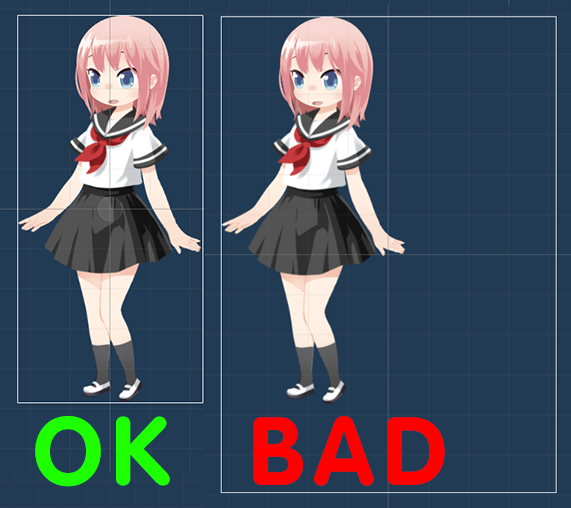
The white frame drawn over the prefab is used to describe the actor canvas, which will be rendered to a render texture at runtime. Make sure to minimize the empty areas inside the frame by moving the layers and groups to prevent wasting texture memory and for anchoring to work correctly. To set a custom canvas size (eg, in case some layers are animated and can stretch out of the default canvas), add Render Canvas component to the root object and set Size property.
You can scale the root game object to fine-tune the default size of the actor.
When authoring layered character art in Photoshop, consider using Unity's PSD Importer package to automatically generate character prefab preserving all the layers and their positions. To preserve the layers hierarchy, make sure to enable Use Layer Grouping option in the import settings.
::: tip
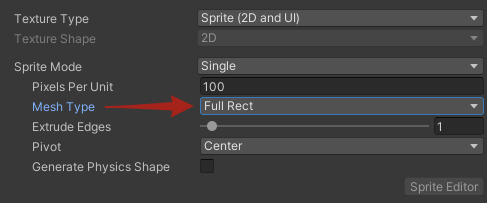
When using sprites, set Mesh Type to Full Rect in the texture import settings to prevent rendering issues.
Don't forget to add the created layered prefab to the character resources (Naninovel -> Resources -> Characters). Choose "Naninovel.LayeredCharacter" implementation and drop prefab to the "Resource" field when configuring the resource record.
To control the layered characters in naninovel scripts, use [@char] command in the same way as with the other character implementations. The only difference is how you set the appearance: instead of a single ID, use the layer composition expression. There are three expression types:
- Enable a single layer in group:
group>layer - Enable a layer:
group+layer - Disable a layer:
group-layer
For example, consider a "Miho" character, which has a "Body" group with three layers: "Uniform", "SportSuit" and "Pajama". To enable "Uniform" layer and disable all the others, use the following command:
@char Miho.Body>Uniform
To enable or disable a layer without affecting any other layers in the group, use "+" and "-" respectively instead of ">". You can also specify multiple composition expressions splitting them with commas:
; Enable glasses, disable hat, select "Cool" emotion.
@char CharId.Head/Accessories+BlackGlasses,Head-Hat,Head/Emotions>Cool
To select a layer outside of any groups (a child of the root prefab object), just skip the group part, eg:
; Given "Halo" layer object is placed under the prefab root, disable it
@char CharId.-Halo
It's also possible to affect all the layers inside a group (and additionally its neighbors when using select expression) by omitting layer name in composition expression:
; Disable all the layers in "Body/Decoration" group
@char CharId.Body/Decoration-

; Enable all the existing layers.
@char CharId.+

; Given `Poses/Light` and `Poses/Dark` groups (each containing multiple layers),
; enable all the layers inside `Light` group and disable layers inside `Dark` group
@char CharId.Poses/Light>
The above expressions will affect not only the direct descendants of the target groups, but all the layers contained in the underlying groups, recursively.
When an appearance is not specified (eg, @char CharId without previously setting any appearance), a default appearance will be used; default appearance of the layered characters equals to how the layered prefab looks in the editor.
The video below demonstrates how to setup a layered character and control it via naninovel commands.
[!!Bl3kXrg8tiI]
::: note
@char Miho.Shoes> command displayed in the video will actually select the "Shoes" group (disabling all the neighbor groups), not hide it. Correct command to hide a group is @char Miho.Shoes-.
:::
It's possible to map composition expressions to keys via Composition Map property of Layered Character Behaviour component:
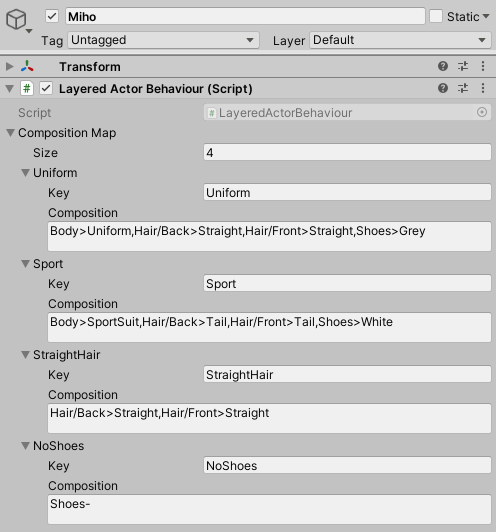
— the keys can then be used to specify layered actor appearance:
; Corresponds to `Body>Uniform,Hair/Back>Straight,Hair/Front>Straight,Shoes>Grey`.
@char Miho.Uniform
; Corresponds to `Hair/Back>Straight,Hair/Front>Straight`.
@char Miho.StraightHair
While editing layered character prefab, it's possible to preview mapped composition expressions by right-clicking a map record and selecting "Preview Composition".

Be aware, that the layer objects are not directly rendered by Unity cameras at runtime; instead, they're rendered once upon each composition (appearance) change to a temporary render texture, which is then fed to a custom mesh visible to the Naninovel camera. This setup is required to prevent semi-transparency overdraw issues and to support transition animation effects.
::: note It's not recommended to use semi-transparent textures for root layers; otherwise, the non-opaque areas will appear darker, than they actually are. If using such layers is a must, one solution is to render the actor in reversed order with a special shader; see the forum thread for an example. :::
In case you wish to apply an animation or other dynamic behaviour to the layered character, enable Animated property found on Layered Character Behaviour component. When the property is enabled, the layers will be rendered each frame (instead once per appearance change).
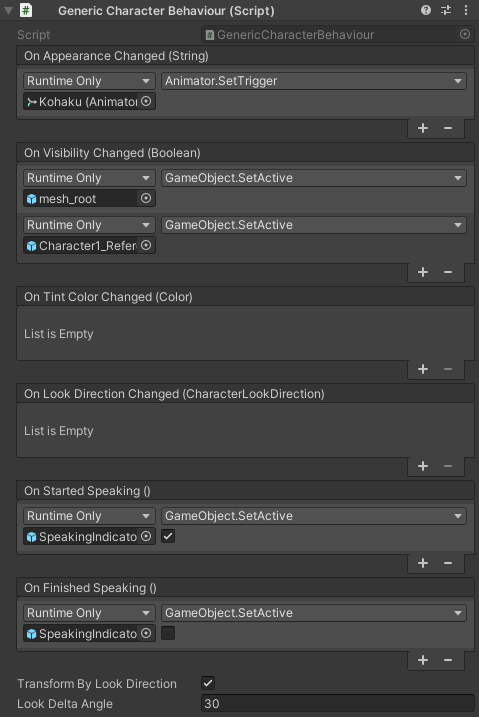
To set up lip sync feature for layered characters, use On Started Speaking and On Finished Speaking Unity events of Layered Character Behaviour component. When the character becomes or ceases to be the author of any printed message (or rather when the message is fully revealed), the events will be invoked allowing you to trigger any custom logic, like starting or stopping mouth animation of the controlled character.
Generic character is the most flexible character actor implementation. It's based on a prefab with a Generic Character Behaviour component attached to the root object. Appearance changes and all the other character parameters are routed as Unity events allowing to implement the behavior of the underlying object in any way you wish.
::: warn Generic actor implementations just route events from the scenario scripts and it's up to user to implement the underlying behaviour, eg how the actor should react to the appearance or visibility change commands, whether and how it will support speaker highlight feature, etc. Don't expect most of the actor-related features to work automatically with the generic implementations. :::
To create generic character prefab from a template, use Create -> Naninovel -> Character -> Generic context asset menu.
To set up lip sync feature for generic characters, use On Started Speaking and On Finished Speaking Unity events of Generic Character Behaviour component. When the character becomes or ceases to be the author of any printed message (or rather when the message is fully revealed), the events will be invoked allowing you to trigger any custom logic, like starting or stopping mouth animation of the controlled character. This is similar to how UI's On Show and On Hide events work; find how they can be used to drive a custom animation in the UI customization guide.
Check the following video tutorial for example on setting up a 3D rigged model as a generic character and routing appearance changes to the rig animations via Animator component. Be aware, that the video is captured with an old Naninovel version and some properties and component names are different now; see the above docs for the up to date information.
[!!HPxhR0I1u2Q]
::: tip
Unity's Animator component could fail to register SetTrigger when the game object is enabled/disabled in the same frame; in case you use GameObject.SetActive to handle visibility changes (as it's shown in the above tutorial), consider enabling/disabling the child objects with renderers instead.
:::
::: example Find example project on GitHub, where generic character implementation is used to host a 3D animated model. :::
Video characters use looped video clip assets to represent the appearance.
For the supported video formats for each platform see Unity docs for video sources.
When using video with an alpha channel (transparency), see the guide on the supported formats.
Live2D character implementation uses assets created with Live2D Cubism 2D modeling and animation software.
[!b81df72fc7afaed569520496cbee09f0]
In order to be able to use this implementation you have to first install Live2D Cubism SDK for Unity. Consult official Live2D docs for the installation and usage instructions.
Then download and import Naninovel's Live2D extension package.
Live2D model prefab used as the resource for the implementation should have a Live2DController component attached to the root object. Appearance changes are routed to the animator component as SetTrigger commands appearance being the trigger name. Eg, if you have a "Kaori" Live2D character prefab and want to invoke a trigger with name "Surprise", use the following command:
@char Kaori.Surprise
Note, that the above command will only attempt to invoke a SetTrigger with "Surprise" argument on the animator controller attached to the prefab; you have to compose underlying animator state machine yourself.
::: note
Current actual version of Cubism SDK for Unity is working directly with Animator component; expressions and poses (exported as expression.json and pose.json), that were previously used in Cubism 2.x are now deprecated and not supported by Naninovel's extension for Live2D.
:::
When Live2D's CubismLookController and CubismMouthController components are present and setup on the Live2D model prefab, Live2DController can optionally use them to control look direction and mouth animation (aka lip sync feature) of the character.
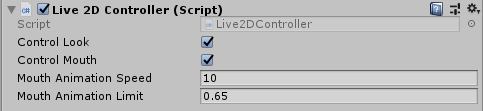
Consult Live2D documentation on eye tracking and lip sync for the setup details.
In case the model appears too small or large, set an initial scale for the root Live2D prefab game object as shown in the video guide.
Internally, Live2D model is rendered to a texture, which is then projected to the screen. This is required to prevent semi-transparency overdraw artifacts when fading the character. Naninovel will attempt to evaluate size of the render canvas automatically, but in case the model contains animated parts that are moved outside of the initial bounds, the parts will be clipped. To prevent that, add Render Canvas component to the root game object of the Live2D prefab and set the desired size of the canvas manually. Enable gizmos to preview current render canvas size while in prefab mode.
[!23f916ae104f57828914221333e42dbf]
Be aware, that larger the size, the more memory will the texture consume, so keep it as small, as possible.
Following video guide covers exporting a Live2D character from Cubism Editor, configuring the prefab, creating a simple animator state machine and controlling the character from a naninovel script.
[!!rw_Z69z0pAg]
::: example Check out an example project on GitHub, where a Live2D character is used with Naninovel. :::
Spine character implementation uses assets created with Spine 2D modeling and animation software.
[!08b04de115d97427d152cb5f37065d2d]
In order to be able to use this implementation you have to first install Spine runtime for Unity. Consult the official docs for the installation and usage instructions.
Then download and import Naninovel's Spine extension package.
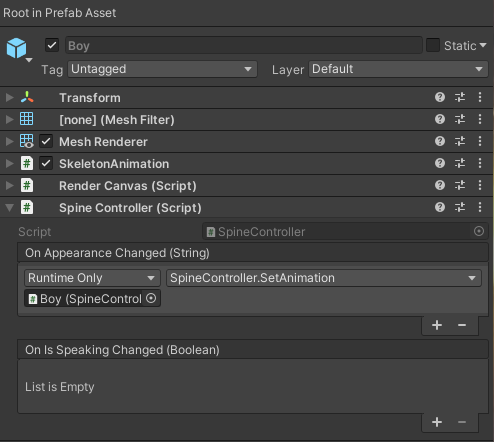
Spine character prefab used as the resource for the implementation should have a Spine Controller component attached to the root object. Appearance changes from naninovel scripts commands (such as @char) are routed to the controller's On Appearance Changed commands similar to generic implementation. You can handle the events as you wish; for example, use Spine's SetAnimation method or invoke a trigger in Unity's animator controller.
::: tip
It's possible to use a custom component inherited from Spine Controller. This way you'll be able to override the virtual methods and associated behaviour (eg, handle appearance change with a specific duration or transition parameters).
:::
Internally, Spine model is rendered to a texture, which is then projected to the screen. This is required to prevent semi-transparency overdraw artifacts when fading the character. To specify the texture size, use Render Canvas component (attached automatically when adding Spine Controller). Enable gizmos to preview current the size while in prefab mode. Be aware, that larger the size, the more memory will the texture consume, so keep it as small, as possible.
::: example Check out an example project on GitHub, where a Spine character is used with Naninovel. :::
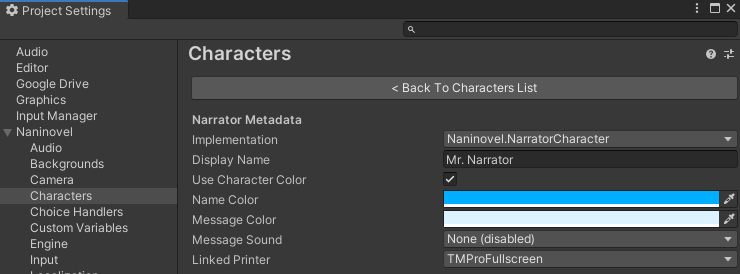
Narrator characters don't have any presence on scene (appearances, position, look direction, tint, etc), but are still able to author printed messages and have the related configuration options (display name, message color, linked printer, etc).
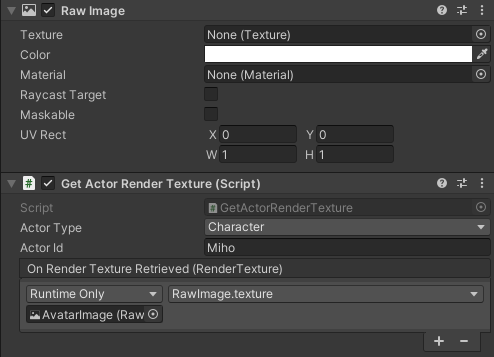
It's possible to render character and background actors of all the implementations (except generic) to a texture asset, which can then can be assigned to a custom UI, printer, material or any other compatible source.
Assign the render texture asset via actor configuration with Render Texture property. When a texture is assigned, the actor won't appear as a game object on scene, but will rather be rendered to the texture. Correct Render Aspect property will show up when a texture is assigned, controlling whether the rendered actor should preserve aspect no matter render texture resolution.

Be aware, that when an actor is rendered to a texture, transformations (position, rotation, scale) and some other modifications won't have any effect. Instead, transform the host object of the render texture (eg, image in case the texture is assigned to UI raw image component).
The video below demonstrates how to render a Live2D character to a texture, which is assigned to custom text printer. The printer is linked to the character, so the character will automatically show and hide with the printer when the associated text messages are processed.
[!!81OTbSAnWbw]
::: example Find a complete example on setting up Live2D character render to texture and binding it with a text printer in the Naninovel Live2D project on GitHub. :::
::: note All the other character and background implementation types (except generic) can be set up to render to texture in the same way, as the Live2D one described above. :::
::: warn
When using addressables package, Unity can't properly track asset references, which may cause render texture duplication in build preventing the feature from working correctly. Either manually handle the references (via AssetReference API) or use Get Actor Render Texture component as illustrated below.